Blogs

5 Key Lesson You Can Learn from SolarWinds Data Breach
January 27, 2021
All You Need to Know About Forex VPS Server
February 18, 2021TeamSpeak is a proprietary VoIP based communication tool that enables audio communications on a chat channel. TeamSpeak client software allows users to choose the best server and join the chat channels. Primarily made for gamers, this communication allows players to communicate with their peers in a multiplayer online game.
TeamSpeak server offers support for 32 concurrent users for free. If you want to add more users, you will have to purchase the gamers license, which increases the support of 1024 concurrent players. If you are a business that wants to use it for internal communication and you have thousands of employees, then you will have to purchase the commercial license.
In this article, you will learn about how to set up a TeamSpeak dedicated server for Windows, Mac and Linux operating systems.
How To Make a TeamSpeak Dedicated Server On Windows?
Here is a step by step process you can follow to create a TeamSpeak dedicated server for Windows operating systems.
- Download TeamSpeak server software for Windows operating system from here
- Extract the files to your desired location
- Open the folder and run the exe installer
- You will be asked to accept the license agreement and whether your firewall allows your software to run or not.
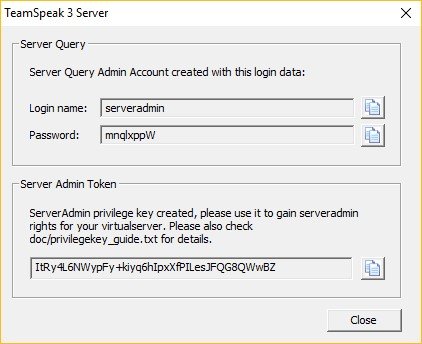
- Once you accept the license agreement, you will receive a privilege key
- To connect with the TeamSpeak server to the client, you need to know your IP address. If you don’t know your IP address, you can type “ipconfig” in the command prompt.
- Note down the IP address and privilege key as you will have to enter both to get admin rights.

How To Make a TeamSpeak Dedicated Server On Mac OS?
Want to create a TeamSpeak dedicated server on Mac OS? Follow the steps given below.
- Download TeamSpeak server setup for Mac from here
- Extract the package by running the downloaded setup
- Run the following commands in the terminal to accept the license agreement
set TS3SERVER_LICENSE=accept
- Go to the extracted TeamSpeak server files by using the terminal window
cd Downloads/teamspeak3-server_mac
- Start the server by typing the following commands
/.ts3server
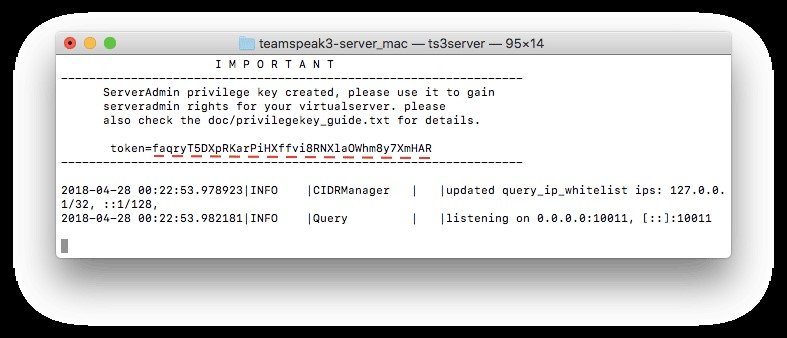
- Wait for few moments until you see your privilege key on your screen
- If you don’t know your IP address, go to System Preferences and choose Network section
Paste the privilege key to get access to server admin rights

How To Make a TeamSpeak Dedicated Server On Ubuntu 16.04?
Here are some of the steps you can follow to setup TeamSpeak on a virtual server running Ubuntu 16.04
- Check whether your system is updated or not by typing this command
apt-get update && apt-get upgrade
- Create a new user by entering this command
adduser –disabled-login teamspeak
- Enter your details and verify that the information you have entered is correct. You can also leave all the fields blank if you want.
- Access the home directory of the new user you have just created by running this command
cd /home/teamspeak
- Download the TeamSpeak server software for Linux from here
- You can also use the wget command to download the server software directly to your VPS server
- Once completed, extract the archive by running this command
tar xvf teamspeak3-server_linux_amd64-3.12.1.tar.bz2
You will see all the components inside teamspeak3-server_linux_amd64 directory. Move everything to the home/teamspeak and remove the download archive by running this command
cd teamspeak3-server_linux_amd64 && mv * /home/teamspeak && cd .. && rm -rf teamspeak3-server_linux_amd64-3.12.1.tar.bz2
- Accept the license agreement by using this command
touch /home/teamspeak/.ts3server_license_accepted
- This will create a new file called .ts3server_license_accepted, with no content because it is a license agreement file.
- To start the server on boot, users will have to create files service in /lib/systemd/system directory. Run the following command to create these files in the directory
sudo nano /lib/systemd/system/teamspeak.service
Here is what the file might look like
[Unit]
Description=TeamSpeak 3 Server
After=network.target
[Service]
WorkingDirectory=/home/teamspeak/
User=teamspeak
Group=teamspeak
Type=forking
ExecStart=/home/teamspeak/ts3server_startscript.sh start inifile=ts3server.ini
ExecStop=/home/teamspeak/ts3server_startscript.sh stop
PIDFile=/home/teamspeak/ts3server.pid
RestartSec=15
Restart=always
[Install]
WantedBy=multi-user.target
- Copy and paste the following code in the new file and save it. Activate the script to make the server start at boot by executing this command
systemctl enable teamspeak.service
systemctl start teamspeak.service
- To make sure it was added, double check it by entering this command
systemctl | grep teamspeak.service
- Check the status of the TeamSpeak server status by running the following command
service teamspeak status
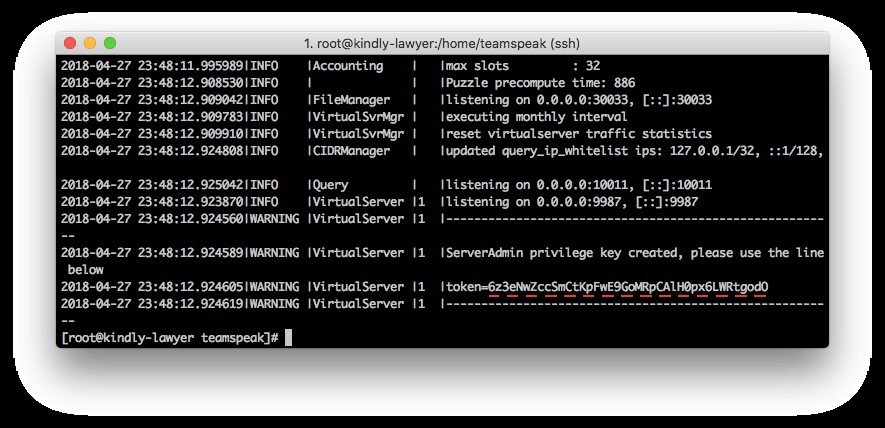
- To retrieve the privilege key, type in the following command
cat /home/teamspeak/logs/ts3server_*
- Enter your privilege key to connect to the newly created TeamSpeak server. Users will also have to enter the IP address of their VPS server when connecting TeamSpeak server to TeamSpeak client.

Which method do you use to set up a TeamSpeak dedicated server on different operating systems? Let us know in the comments section below.
Featured Post
Hidden ARK Survival Evolved Maps Features Nobody Shares
Table of Contents Key Takeaways: Understanding ARK Survival Evolved Maps The Island: Hidden Features on ARK’s Original Map Underwater Cave Layers Dynamic Spawn Zones Ragnarok: Secrets […]
Dedicated Server With GPUs: The Ultimate Guide
There are various types of servers, each designed to cater to different workloads and use cases. Among these, dedicated server with GPU (Graphics Processing Unit) have […]
Conan Exiles Server: A Complete Guide to Hosting
Table of Contents Conan Exiles Server Hosting Options Self-Hosting a Server: Third-Party Hosting: Private Servers: Conan Exiles Dedicated Server Setup Download the Server Files: Configure the […]


