Blogs
Key Takeaways:
- Set up your VPS – Update packages, create a non-root user, and connect over SSH.
- Point your domain at the server – Add a DNS A record early, since it needs time to propagate.
- Enable a firewall – Allow only SSH and Nginx (ports 80/443); keep n8n’s own port closed to the public.
- Install Docker & Docker Compose – Gives you a clean, isolated environment for n8n and its database.
- Choose PostgreSQL over SQLite – Handles concurrent traffic reliably and is required if you ever scale to queue mode.
- Create your
.envfile – Store your domain, database credentials, and encryption key in one place; generate the key withopenssl rand -hex 32and back it up immediately (it can’t be recovered if lost). - Write the
docker-compose.yml– Defines n8n + Postgres together, with n8n bound to127.0.0.1so it’s only reachable through Nginx. - Configure Nginx as a reverse proxy – Routes public HTTPS traffic to n8n internally; include WebSocket headers so the editor’s live updates work.
- Get a free SSL certificate – Use Certbot + Let’s Encrypt for HTTPS, with automatic renewal.
- Launch n8n –
docker compose up -d, then verify both containers are running and healthy. - Create your owner account – n8n’s built-in login system (replaces the old basic-auth method).
- Maintain it – Update with
docker compose pull && docker compose up -d; back up the database and.envfile regularly.
Why this guide is for you…
You’ve decided you want to run n8n — the workflow automation tool — on your own Linux server instead of paying for n8n Cloud. Maybe you found a tutorial that assumed you already know what a “reverse proxy” is, or one that skipped straight past the parts that actually broke on your machine. This guide doesn’t do that.
You don’t need to be a system administrator to follow this. You do need to be comfortable typing commands into a terminal and copy-pasting carefully. Everywhere a decision has more than one right answer, this guide tells you why it recommends what it recommends, so you’re not just following steps blindly.
By the end, you’ll have:
- n8n running in VPS or Docker or a Linux VPS
- Your own domain pointing at it, with a free, auto-renewing SSL certificate (so it’s https://n8n.yourdomain.com, not a scary unencrypted address)
- A PostgreSQL database backing it (more on why this matters for production)
- A basic understanding of how to update it, back it up, and fix the two or three things that most commonly go wrong
What you’ll need before starting
| Requirement | Notes |
| A cloud VPS | Any provider works — DigitalOcean, Hetzner, Linode, Contabo, AWS Lightsail, etc. 1 vCPU / 2GB RAM is enough to start. |
| Ubuntu 24.04 LTS (or similar) | This guide uses Ubuntu commands. Debian is nearly identical. |
| A domain name | You need a domain (or subdomain) you can point at your server, e.g. n8n.yourdomain.com. |
| SSH access to your server | You should be able to run ssh root@your-server-ip from your computer’s terminal. |
| About 45–60 minutes | Slower the first time; most of it is waiting for things to install. |
If you don’t have a domain yet, get one before you start — DNS changes can take a little time to spread across the internet, and it’s the one step you can’t easily rush at the end.
Prequisites for setting up n8n on Linux
Before typing anything, it helps to see the finished picture. Here’s what you’re building:
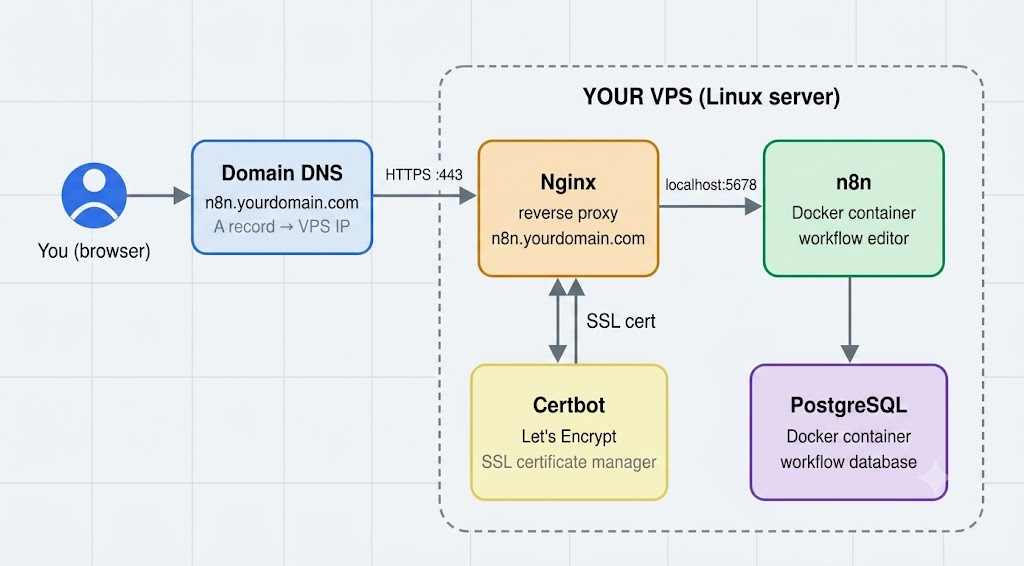
Four moving parts, each with a specific job:
- Nginx sits at the “front door” of your server. It’s the only thing listening on the public internet (ports 80/443). It receives requests and quietly hands them off to n8n.
- n8n itself runs inside a Docker container, only reachable from inside the server — not directly from the internet. This is a deliberate security choice, explained below.
- PostgreSQL is n8n’s database — where your workflows, credentials, and execution history live.
- Certbot is a small tool that gets you a free SSL certificate from Let’s Encrypt and quietly renews it every 90 days so you never have to think about it again.
Why not just expose n8n directly on port 5678 and skip Nginx entirely? You can — n8n works fine that way for quick local testing. But for a real, public-facing deployment, putting Nginx in front gets you HTTPS (browsers refuse to trust automation tools without it, and some services won’t send webhooks to an insecure endpoint), a stable port 443 instead of an unusual one, and a place to add protections later (rate limiting, IP allowlists) without touching n8n’s own configuration.
Step 1: Connect to your server and do basic setup
SSH into your fresh server:
ssh root@YOUR_SERVER_IPUpdate the system so you’re building on current packages, not outdated ones:
sudo apt update && sudo apt upgrade -yIt’s good practice to avoid working as root day-to-day. Create a regular user with admin rights:
adduser deploy
usermod -aG sudo deploy
Follow the prompts to set a password, then switch to that user for the rest of this guide:
su - deployWhy this matters: if a workflow or a compromised dependency ever executes something unexpected, running as a non-root user limits the damage it can do to the system. It’s a five-minute step that’s genuinely worth doing.
Step 2: Point your domain at the server
Log into wherever you manage your domain’s DNS (your registrar, or Cloudflare, etc.) and create an A record:
| Type | Name | Value |
| A | n8n (for n8n.yourdomain.com) | Your server’s public IP address |
Do this now, even though you won’t need it for a few more steps — DNS changes can take anywhere from a few minutes to a few hours to fully propagate. Starting the clock early means it’s usually ready by the time you get to the SSL certificate step.
You can check whether it’s propagated with:
nslookup n8n.yourdomain.comIf it returns your server’s IP, you’re good.
Step 3: Set up a basic firewall
Your VPS is publicly reachable the moment it’s created, which means it’s also being scanned by bots within minutes. A firewall that only allows the traffic you actually need is cheap insurance:
sudo ufw allow OpenSSH
sudo ufw allow 'Nginx Full'
sudo ufw enable
Nginx Full opens both port 80 (HTTP, needed briefly for the certificate step) and port 443 (HTTPS). Notice that port 5678 — n8n’s own port — is not on this list. That’s intentional: nothing outside the server needs to reach it directly, since Nginx will forward traffic to it internally.
Check it’s active:
sudo ufw statusStep 4: Install Docker and Docker Compose
n8n’s own documentation recommends Docker for self-hosting, and for good reason: it bundles n8n with the exact Node.js version and dependencies it expects, so you avoid the classic “works on their machine, not mine” problem. Docker Compose then lets you describe your entire stack (n8n + database) in one file instead of running a string of manual commands.
Install Docker using the official repository (more reliable long-term than the quick-install scripts you’ll see elsewhere):
If you don’t have it yet, follow Docker’s official installation guide for your specific Linux instance.
sudo apt install -y ca-certificates curl gnupg
sudo install -m 0755 -d /etc/apt/keyrings
curl -fsSL https://download.docker.com/linux/ubuntu/gpg | sudo gpg --dearmor -o /etc/apt/keyrings/docker.gpg
sudo chmod a+r /etc/apt/keyrings/docker.gpg

echo \
  "deb [arch=$(dpkg --print-architecture) signed-by=/etc/apt/keyrings/docker.gpg] https://download.docker.com/linux/ubuntu \
  $(. /etc/os-release && echo "$VERSION_CODENAME") stable" | \
  sudo tee /etc/apt/sources.list.d/docker.list > /dev/null

sudo apt update
sudo apt install -y docker-ce docker-ce-cli containerd.io docker-buildx-plugin docker-compose-plugin
Let your user run Docker without typing sudo every time:
sudo usermod -aG docker $USER
newgrp docker
Confirm it worked:
docker --version
docker compose version
You should see version numbers for both, with no errors.
Step 5: Choose your database — SQLite vs PostgreSQL
n8n needs somewhere to store your workflows, credentials, and execution logs. By default it uses SQLite — a database that’s just a single file, with zero setup required. For local testing, that’s genuinely fine.
For a production deployment reachable from the internet, this guide uses PostgreSQL instead. Here’s the actual reasoning, not just “best practice”:
- SQLite writes to a single file with limited concurrent-write handling. Under real traffic — several workflows firing at once, webhooks arriving while you’re editing in the UI — that can lead to “database is locked” errors.
- If you ever want to scale n8n beyond one instance (n8n’s “queue mode,” for handling heavier workloads), Postgres is a hard requirement, not an option. Starting with it now avoids a painful migration later.
- Backups are more straightforward and standard with Postgres — you can use conventional tools like pg_dump rather than carefully copying a live SQLite file.
If your use case is genuinely light (a personal instance with a handful of workflows), SQLite will work and you can skip the Postgres parts of the compose file below. This guide includes Postgres because you told us this is for real production use.
Step 6: Create your project folder and environment file
Create a directory to hold everything:
mkdir ~/n8n-server && cd ~/n8n-server
mkdir local-files
local-files will be shared between n8n and your server’s filesystem — useful if you ever use n8n’s “Read/Write Files from Disk” node.
Now generate an encryption key. n8n uses this to encrypt every credential (API keys, passwords) you store in it:
openssl rand -hex 32Copy the output somewhere safe right now — write it down outside the server too (a password manager is ideal). This is the single most important value in this whole setup: if you lose it, every stored credential becomes permanently unreadable, with no recovery path. This isn’t a scare tactic — it’s how the encryption is designed to work, and it’s worth the thirty seconds of caution.
Create a .env file to hold your settings and secrets in one place:
nano .envPaste this in, replacing the placeholder values with your own:
# Your domain (must match the DNS A record you created in Step 2)
DOMAIN_NAME=n8n.yourdomain.com

# Timezone — find yours at https://en.wikipedia.org/wiki/List_of_tz_database_time_zones
TIMEZONE=Etc/UTC

# Postgres credentials — pick your own strong password
POSTGRES_USER=n8n
POSTGRES_PASSWORD=change-this-to-a-strong-password
POSTGRES_DB=n8n

# The key you generated with `openssl rand -hex 32` above
N8N_ENCRYPTION_KEY=paste-your-generated-key-here
Save and exit (in nano: Ctrl+O, Enter, then Ctrl+X).
Lock the file down so only your user can read it — it contains passwords:
chmod 600 .envStep 7: Write the Docker Compose file
This is the file that tells Docker what to run and how the pieces connect. Create it:
nano docker-compose.ymlPaste in the following:
services:
  postgres:
    image: postgres:16
    restart: unless-stopped
    environment:
      - POSTGRES_USER=${POSTGRES_USER}
      - POSTGRES_PASSWORD=${POSTGRES_PASSWORD}
      - POSTGRES_DB=${POSTGRES_DB}
    volumes:
      - postgres_data:/var/lib/postgresql/data
    healthcheck:
      test: ["CMD-SHELL", "pg_isready -U ${POSTGRES_USER} -d ${POSTGRES_DB}"]
      interval: 5s
      timeout: 5s
      retries: 10

  n8n:
    image: docker.n8n.io/n8nio/n8n
    restart: unless-stopped
    ports:
      - "127.0.0.1:5678:5678"
    environment:
      - N8N_HOST=${DOMAIN_NAME}
      - N8N_PROTOCOL=https
      - N8N_PORT=5678
      - WEBHOOK_URL=https://${DOMAIN_NAME}/
      - N8N_PROXY_HOPS=1
      - N8N_ENCRYPTION_KEY=${N8N_ENCRYPTION_KEY}
      - GENERIC_TIMEZONE=${TIMEZONE}
      - TZ=${TIMEZONE}
      - DB_TYPE=postgresdb
      - DB_POSTGRESDB_HOST=postgres
      - DB_POSTGRESDB_PORT=5432
      - DB_POSTGRESDB_DATABASE=${POSTGRES_DB}
      - DB_POSTGRESDB_USER=${POSTGRES_USER}
      - DB_POSTGRESDB_PASSWORD=${POSTGRES_PASSWORD}
    volumes:
      - n8n_data:/home/node/.n8n
      - ./local-files:/files
    depends_on:
      postgres:
        condition: service_healthy

volumes:
  postgres_data:
  n8n_data:
A few lines deserve explanation, because copy-pasting without understanding them is exactly how people get stuck later:
- “127.0.0.1:5678:5678” — this binds n8n’s port to localhost only, not to the public internet. Combined with the firewall from Step 3, this means the only path into n8n is through Nginx. Someone can’t bypass your SSL certificate and login screen by hitting your-ip:5678 directly.
- WEBHOOK_URL — this is the single most common source of confusion in n8n self-hosting. Without it, n8n guesses its own public address and frequently gets it wrong when running behind a proxy, which means webhook nodes generate URLs containing localhost — completely unreachable from the outside. Setting it explicitly avoids that entirely.
- N8N_PROXY_HOPS=1 — tells n8n that requests pass through exactly one reverse proxy (your Nginx) before reaching it, so it correctly reads the visitor’s real IP and protocol instead of Nginx’s internal ones.
- depends_on: condition: service_healthy — makes sure n8n waits for Postgres to actually be ready to accept connections, not just for the container to have started. This avoids a race condition on first boot.
- The n8n_data volume — this is where n8n stores things that live outside the database: your encryption key backup, installed community nodes, and binary file data. Losing this volume without a backup means losing that data, so it’s included in the backup steps later.
Step 8: Install and configure Nginx
Install Nginx:
sudo apt install -y nginxCreate a configuration file for your n8n site:
sudo nano /etc/nginx/sites-available/n8nPaste this in (replace n8n.yourdomain.com with your actual domain):
server {
    listen 80;
    server_name n8n.yourdomain.com;

    client_max_body_size 50M;

    location / {
        proxy_pass http://127.0.0.1:5678;
        proxy_http_version 1.1;
        proxy_set_header Upgrade $http_upgrade;
        proxy_set_header Connection "upgrade";
        proxy_set_header Host $host;
        proxy_set_header X-Real-IP $remote_addr;
        proxy_set_header X-Forwarded-For $proxy_add_x_forwarded_for;
        proxy_set_header X-Forwarded-Proto $scheme;
        proxy_read_timeout 300s;
    }
}
Two details worth calling out:
- The Upgrade/Connection “upgrade” headers are there for WebSockets. n8n’s editor uses a WebSocket connection for live updates while you’re building a workflow — without these two lines, the interface loads but silently loses real-time features, which is a confusing bug to track down after the fact.
- client_max_body_size 50M raises Nginx’s default upload limit, since workflows that handle files or larger payloads can otherwise get rejected before they even reach n8n.
Enable the site and check the config for typos:
sudo ln -s /etc/nginx/sites-available/n8n /etc/nginx/sites-enabled/
sudo nginx -t
If it says syntax is ok and test is successful, reload Nginx:
sudo systemctl reload nginxStep 9: Get a free SSL certificate with Let’s Encrypt
Install Certbot along with its Nginx plugin, which will edit your config automatically:
sudo apt install -y certbot python3-certbot-nginxRequest and install the certificate:
sudo certbot --nginx -d n8n.yourdomain.comCertbot will ask for an email (for renewal notices) and whether to redirect HTTP to HTTPS — say yes. If this step fails with a “connection refused” or timeout error, it almost always means your DNS record from Step 2 hasn’t propagated yet. Wait a while and try again.
Certbot’s certificates expire every 90 days, but it installs an automatic renewal job for you. You can double-check it’s set up correctly with a dry run:
sudo certbot renew --dry-runStep 10: Launch n8n
Back in your project folder, start everything:
cd ~/n8n-server
docker compose up -d
The -d runs it in the background. Watch the logs to make sure both containers start cleanly:
docker compose logs -fYou should see Postgres report it’s ready to accept connections, followed by n8n starting up and listening on port 5678. Press Ctrl+C to stop watching the logs (this doesn’t stop the containers).
Check both containers are actually running:
docker compose psBoth n8n-server-postgres-1 and n8n-server-n8n-1 should show a status of Up (and healthy for Postgres).
Step 11: Open n8n and create your account
Visit https://n8n.yourdomain.com in your browser. You should see a valid padlock icon (thanks to Certbot) and n8n’s setup screen.
This first screen creates your owner account — n8n’s built-in login system, not a separate password you configure through environment variables. (Older guides mention a N8N_BASIC_AUTH_ACTIVE variable; that mechanism was removed from current n8n versions in favor of this proper account system, so don’t be confused if you see it referenced elsewhere.)
Enter your email and a password (at least 8 characters, with one number and one capital letter), and you’re in. From here you can invite additional users under Settings → Users if others need access.
Step 12: Updating n8n safely
n8n ships new releases frequently. To update:
cd ~/n8n-server
docker compose pull
docker compose up -d
This pulls the newest image and recreates only the containers that changed, leaving your data volumes untouched. Before updating across a major version (e.g. 1.x to 2.x), skim n8n’s release notes for breaking changes — most minor updates are safe to apply without reading anything, but major versions occasionally require a manual step.
Backing up your data
Two things need backing up regularly: the Postgres database, and the n8n_data volume (which holds your encryption key backup and any binary file data).
A simple backup script:
#!/bin/bash
BACKUP_DIR=~/n8n-backups/$(date +%Y-%m-%d)
mkdir -p "$BACKUP_DIR"

cd ~/n8n-server

# Dump the Postgres database
docker compose exec -T postgres pg_dump -U n8n n8n > "$BACKUP_DIR/n8n-db.sql"

# Back up the n8n_data volume
docker run --rm -v n8n-server_n8n_data:/data -v "$BACKUP_DIR":/backup alpine \
  tar czf /backup/n8n_data.tar.gz -C /data .
Save this as backup.sh, make it executable with chmod +x backup.sh, and consider scheduling it with cron to run daily. Also keep a copy of your .env file somewhere safe outside the server — it holds your encryption key, and without it a restored database is useless.
Troubleshooting common issues
| Symptom | Likely cause | Fix |
| Nginx shows “502 Bad Gateway” | n8n container isn’t running, or Nginx is pointing at the wrong port | Run docker compose ps to confirm n8n is Up; check docker compose logs n8n for startup errors |
| Webhook URLs contain localhost instead of your domain | WEBHOOK_URL wasn’t set, or you changed it without restarting | Confirm it’s in your .env/compose file, then docker compose up -d again |
| Browser shows a certificate warning | DNS hadn’t propagated when Certbot ran, or you’re visiting via IP instead of domain | Re-run sudo certbot –nginx -d n8n.yourdomain.com once DNS is confirmed with nslookup |
| “Too many redirects” in the browser | Mismatch between N8N_PROTOCOL=https and how Nginx is actually forwarding traffic | Double-check the X-Forwarded-Proto header is set in your Nginx config, and that N8N_PROXY_HOPS=1 is set |
| docker: permission denied | Your user isn’t in the docker group, or the group membership hasn’t taken effect yet | Re-run sudo usermod -aG docker $USER then log out and back in |
| Editor loads but feels “stuck” / no live updates | WebSocket headers missing from Nginx config | Confirm the Upgrade and Connection “upgrade” lines are present, then sudo systemctl reload nginx |
What’s the next step?
You now have a working, secured, production-oriented n8n deployment: HTTPS by default, a proper database, an isolated container that isn’t directly exposed to the internet, and a repeatable way to update and back it up.
A few sensible next steps once you’re comfortable:
- Set up email (SMTP) in n8n’s settings so you can invite teammates and use password resets, rather than managing every account by hand.
- Enable two-factor authentication on your owner account under Settings → Personal.
- If you ever outgrow a single instance — heavy workflow volume, many concurrent webhooks — look into n8n’s “queue mode,” which distributes execution across worker containers using Redis. It’s a natural next step from this Postgres-backed setup, not a rebuild.
That’s the full path from an empty VPS to a secured, self-hosted n8n instance running on your own domain.
While self-hosting is powerful, maintaining servers, running security updates, and scaling databases can take up valuable development time.
Save yourself the DevOps overhead by scaling your workflows on HostNoc’s n8n AI hosting solutions.

Featured Post
How to Install n8n on a VPS?
If you’ve searched for “how to install n8n on a VPS,” you’ve...

Ashad Ubaid
July 17, 2026