Blogs
Key Takeaways:
- Provision your Ubuntu VPS – Choose Ubuntu 24.04 LTS (or 22.04 LTS), then connect using SSH with your server’s public IP and root credentials.
- Point your domain to the server – Create a DNS A record for your n8n subdomain and allow time for DNS propagation before launching the application.
- Secure the server with a firewall – Enable UFW and allow only SSH, HTTP, and HTTPS. Keep n8n’s port (5678) inaccessible from the public internet.
- Install Docker and Docker Compose – Use Docker’s official installation script to create an isolated, easy-to-maintain environment for n8n.
- Create your project files – Set up an n8n-compose directory, create a .env file with your domain, timezone, and SSL email, and add a local-files directory for workflow file storage.
- Deploy the official Docker Compose stack – Configure Traefik and n8n using the official Compose file, exposing only Traefik while binding n8n to 127.0.0.1 for better security.
- Let Traefik handle HTTPS – Automatically obtain and renew free Let’s Encrypt SSL certificates while routing secure traffic to your n8n instance.
- Launch your containers – Start the stack with docker compose up -d and verify both the Traefik and n8n containers are running correctly.
- Create your owner account – Complete n8n’s initial setup by creating the administrator account you’ll use to manage workflows and credentials.
- Keep n8n up to date – Update the application with docker compose pull and docker compose up -d whenever new releases become available.
- Back up your data regularly – Save the n8n_data Docker volume along with your compose.yaml and .env files to make recovery simple if your server ever fails.
- Troubleshoot common issues quickly – Check DNS propagation, SSL certificate status, container logs, and Docker permissions before assuming the installation has failed.
If you’ve searched for “how to install n8n on a VPS,” you’ve probably already found half a dozen tutorials — and maybe gotten stuck on at least one of them. Some skip the domain and SSL setup entirely, and then your webhooks mysteriously don’t work. Others hand you a Docker command with zero explanation and leave you Googling what half the flags mean.
This guide is written for the opposite experience. You don’t need to know Linux. You don’t need to have used Docker before. You just need a VPS, a domain name, about 45 minutes, and the ability to copy and paste carefully.
By the end, you’ll have:
- n8n running on your own Ubuntu VPS
- A real domain (like n8n.yourdomain.com) pointing to it
- Free, auto-renewing HTTPS so webhooks and integrations actually work
- Your workflow data persisting safely, even after restarts or updates
Before You Begin – What You’ll Need?
Gather these four things first so you’re not hunting for them mid-setup:
- A VPS running Ubuntu. This guide uses HostNoc, which offers Ubuntu as one of its standard Linux distributions alongside Debian and CentOS — so it’s readily available when you provision your server. Choose Ubuntu 24.04 LTS if it’s offered; if not, 22.04 LTS works identically for everything in this guide.
- A domain name (e.g., yourdomain.com), purchased from any registrar (Namecheap, GoDaddy, Google Domains, etc.). You don’t need a new one — a subdomain like n8n.yourdomain.com works fine off a domain you already own.
- A terminal on your own computer. macOS and Linux have one built in (Terminal). Windows 10/11 has SSH built into PowerShell and Windows Terminal — no extra software needed.
- About 45 minutes and a willingness to copy commands exactly as written. Precision matters more than speed here.
We have also covered a complete guide on how you can setup N8N on Linux based server.
Why the domain and SSL aren’t optional
It’s tempting to skip straight to “just get n8n running” and worry about the domain later. Here’s why that backfires: n8n’s webhook-triggered nodes (the ones that let n8n react to events from Slack, Stripe, GitHub, and hundreds of other services) need to be reachable over the public internet at a stable, HTTPS address. Most third-party services refuse to send data to a plain HTTP endpoint. Setting up the domain and SSL now — while it’s still simple — saves you from re-doing your entire setup later.
What You’re Actually Building?
Before typing anything, it helps to see the finished shape of the thing, so each step below makes sense in context.
Here’s what happens when someone (including you) visits n8n.yourdomain.com:
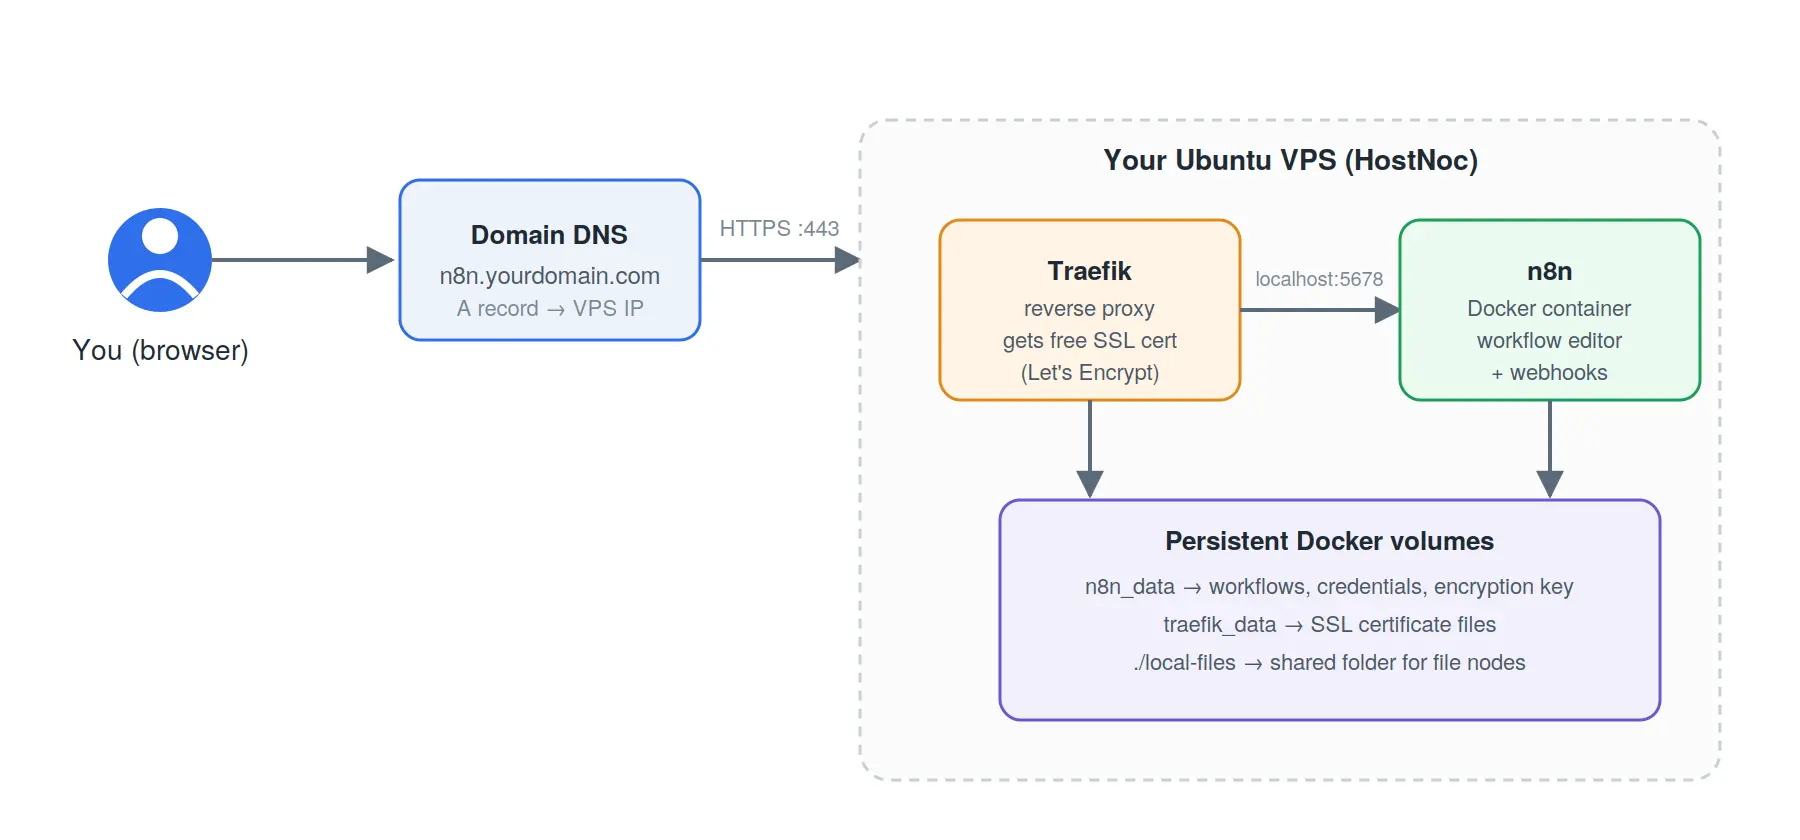
In plain terms:
- Your domain’s DNS points visitors to your VPS’s IP address.
- Traffic hits Traefik, a small reverse proxy running in its own Docker container. Traefik automatically requests and renews a free SSL certificate from Let’s Encrypt, so your n8n instance is always served over HTTPS.
- Traefik forwards the request internally to the n8n container, which isn’t exposed directly to the internet — only Traefik can reach it.
- n8n’s workflows, credentials, and its encryption key live in a persistent Docker volume, so they survive restarts, server reboots, and future updates.
This is the exact architecture n8n’s own documentation sets up in its official Docker Compose guide — you’re not getting a simplified or improvised version.
Step 1: Spin Up Your Ubuntu VPS on HostNoc
- Log in to your HostNoc account (or sign up if you’re new) and order a VPS plan. A KVM-based VPS with at least 2 GB of RAM is a comfortable starting point for n8n plus Traefik — n8n itself is lightweight, but you want headroom for Docker and any workflows you build later.
- During setup, choose Ubuntu 24.04 LTS (or 22.04 LTS) as your operating system.
- Complete the order. HostNoc will email you your server’s public IP address and root password once it’s provisioned — this usually takes a few minutes.
Keep that email open; you’ll need the IP and password in the next two steps.
Step 2: Point Your Domain at the VPS
While your VPS finishes provisioning, set up the DNS side.
- Log in to wherever you manage your domain’s DNS (your registrar, or Cloudflare if you use it).
- Create an A record like this:
| Type | Name (host) | Value |
| A | n8n | your_vps_ip_address |
This makes n8n.yourdomain.com resolve to your server.
- DNS changes take time to propagate — anywhere from a few minutes to a few hours, depending on your provider. You can move on to the next steps while you wait; you’ll only need the DNS to be live by the time you start n8n itself.
Step 3: Connect to Your VPS via SSH
Open a terminal on your own computer and connect using the IP address from your HostNoc email:
ssh root@your_vps_ip_addressThe first time you connect, you’ll see a message asking you to confirm the server’s fingerprint — type yes and press Enter. Then paste in the root password from your email when prompted.
Heads up: nothing appears on screen while you type or paste the password — no dots, no cursor movement. That’s normal password-masking behavior in SSH, not a bug. Just paste it and press Enter.If everything worked, your prompt will change to something like root@your-server-name:~#. You’re in.
Step 4: Update the Server and Do Basic Housekeeping
Before installing anything, update the system so you’re not building on outdated packages:
apt update && apt upgrade -yThis refreshes the list of available packages and installs any pending security updates. Press through any prompts with the default option if asked.
Open the firewall for the ports you’ll actually need
Ubuntu ships with ufw (Uncomplicated Firewall) available. Enabling it and explicitly allowing only the ports n8n’s setup needs is a simple, meaningful security improvement:
ufw allow OpenSSH
ufw allow 80/tcp
ufw allow 443/tcp
ufw enable- Port 22 (via OpenSSH) keeps your SSH access open — allow this first, or you’ll lock yourself out.
- Port 80 is needed briefly for Let’s Encrypt’s certificate verification and to redirect HTTP to HTTPS.
- Port 443 is your actual HTTPS traffic.
Notice n8n’s own port, 5678, isn’t opened here at all — that’s intentional and explained in Step 6.
Step 5: Install Docker and Docker Compose
Docker isn’t preinstalled on a fresh Ubuntu VPS, so you’ll add it using Docker’s official installation script, which handles adding the correct repository for your Ubuntu version automatically:
curl -fsSL https://get.docker.com -o get-docker.sh
sh get-docker.sh
Once it finishes, confirm both Docker and Docker Compose (which ships as a plugin with modern Docker installs) are available:
docker –version
docker compose version
You should see version numbers printed for both. If either command isn’t found, re-run the install script — it’s safe to run more than once.
Step 6: Set Up n8n With Docker Compose
This is the core of the guide. You’ll create three things: a folder for your project, an environment file with your settings, and a Docker Compose file that tells Docker what to run.
6.1 Create your project folder
mkdir n8n-compose
cd n8n-compose
6.2 Create the .env file
This file holds your personal settings — your domain, timezone, and the email used for SSL certificates. Create it with a text editor:
nano .envPaste in the following, replacing the values with your own:
# The top-level domain to serve from
DOMAIN_NAME=yourdomain.com

# The subdomain to serve n8n on — combined with DOMAIN_NAME this
# gives you https://n8n.yourdomain.com
SUBDOMAIN=n8n

# Timezone used by n8n's Cron and scheduling nodes
GENERIC_TIMEZONE=Asia/Karachi

# Email address used for your free SSL certificate (Let's Encrypt
# sends renewal notices here if something goes wrong)
SSL_EMAIL=you@example.com
Save and exit nano with Ctrl+O, then Enter, then Ctrl+X.
A note on the timezone: use a valid IANA timezone name like Asia/Karachi, Europe/London, or America/New_York. If you’re unsure of your exact one, Asia/Karachi covers Pakistan Standard Time.6.3 Create the shared files folder
mkdir local-filesThis gives n8n a folder on your actual server that its workflows can read from and write to (useful for nodes like “Read/Write Files from Disk”). Creating it manually — rather than letting Docker create it automatically — ensures it has the correct ownership from the start.
6.4 Create the Docker Compose file
nano compose.yamlPaste in the following exactly as-is. This is n8n’s own officially documented Compose configuration — it runs two containers: Traefik (handles HTTPS and routing) and n8n itself.
services:
  traefik:
    image: "traefik"
    restart: always
    command:
      - "--api.insecure=true"
      - "--providers.docker=true"
      - "--providers.docker.exposedbydefault=false"
      - "--entrypoints.web.address=:80"
      - "--entrypoints.web.http.redirections.entryPoint.to=websecure"
      - "--entrypoints.web.http.redirections.entrypoint.scheme=https"
      - "--entrypoints.websecure.address=:443"
      - "--certificatesresolvers.mytlschallenge.acme.tlschallenge=true"
      - "--certificatesresolvers.mytlschallenge.acme.email=${SSL_EMAIL}"
      - "--certificatesresolvers.mytlschallenge.acme.storage=/letsencrypt/acme.json"
    ports:
      - "80:80"
      - "443:443"
    volumes:
      - traefik_data:/letsencrypt
      - /var/run/docker.sock:/var/run/docker.sock:ro

  n8n:
    image: docker.n8n.io/n8nio/n8n
    restart: always
    ports:
      - "127.0.0.1:5678:5678"
    labels:
      - traefik.enable=true
      - traefik.http.routers.n8n.rule=Host(`${SUBDOMAIN}.${DOMAIN_NAME}`)
      - traefik.http.routers.n8n.tls=true
      - traefik.http.routers.n8n.entrypoints=web,websecure
      - traefik.http.routers.n8n.tls.certresolver=mytlschallenge
      - traefik.http.middlewares.n8n.headers.SSLRedirect=true
      - traefik.http.middlewares.n8n.headers.STSSeconds=315360000
      - traefik.http.middlewares.n8n.headers.browserXSSFilter=true
      - traefik.http.middlewares.n8n.headers.contentTypeNosniff=true
      - traefik.http.middlewares.n8n.headers.forceSTSHeader=true
      - traefik.http.middlewares.n8n.headers.SSLHost=${DOMAIN_NAME}
      - traefik.http.middlewares.n8n.headers.STSIncludeSubdomains=true
      - traefik.http.middlewares.n8n.headers.STSPreload=true
      - traefik.http.routers.n8n.middlewares=n8n@docker
    environment:
      - N8N_ENFORCE_SETTINGS_FILE_PERMISSIONS=true
      - N8N_HOST=${SUBDOMAIN}.${DOMAIN_NAME}
      - N8N_PORT=5678
      - N8N_PROTOCOL=https
      - NODE_ENV=production
      - WEBHOOK_URL=https://${SUBDOMAIN}.${DOMAIN_NAME}/
      - GENERIC_TIMEZONE=${GENERIC_TIMEZONE}
      - TZ=${GENERIC_TIMEZONE}
    volumes:
      - n8n_data:/home/node/.n8n
      - ./local-files:/files

volumes:
  n8n_data:
  traefik_data:
Save and exit the same way: Ctrl+O, Enter, Ctrl+X.
What this file is actually doing (in plain English)
- traefik service: listens on ports 80 and 443 (the ones you opened in the firewall), automatically redirects any HTTP visitor to HTTPS, and requests/renews your SSL certificate from Let’s Encrypt without you ever touching Certbot manually.
- n8n service: runs n8n itself, but notice the port mapping — 127.0.0.1:5678:5678 means n8n is only reachable from inside the server, not directly from the internet. The only way in is through Traefik. This is why you didn’t open port 5678 in your firewall earlier; it was never meant to be public.
- volumes: n8n_data is where n8n stores its database file and its encryption key (the key that protects your saved credentials) — this is the single most important thing to back up, covered in Step 9. traefik_data stores your SSL certificate so it isn’t re-requested every time the container restarts.
Step 7: Launch n8n
With your .env and compose.yaml files both in the n8n-compose folder, start everything with:
sudo docker compose up -dThe -d flag runs the containers in the background so they keep running after you close your terminal. The first run will take a minute or two as Docker downloads the Traefik and n8n images.
Check that both containers are running:
docker compose psYou should see two entries — traefik and n8n — both showing a status of Up.
Step 8: Open n8n and Create Your Owner Account
Give DNS and the SSL certificate a minute to settle, then visit:
https://n8n.yourdomain.com(using your actual domain and subdomain from the .env file).
The first time you load it, n8n will ask you to set up an owner account — an email address, name, and password for the main admin user of your instance. This is your own local account; it isn’t sent anywhere. Fill it in and you’ll land on the n8n editor, ready to build workflows.
If the page doesn’t load, don’t panic — jump to the Troubleshooting section below before assuming something’s broken.
Step 9: Keep n8n Updated and Backed Up
A working n8n instance isn’t “install once and forget.” Two habits will save you real pain later.
Updating n8n
n8n releases new versions frequently. To update, from inside your n8n-compose folder:
docker compose pull
docker compose up -d
This pulls the latest image and recreates the container — your data in n8n_data isn’t touched.
Always back up before updating, especially before a major version jump. Check n8n’s release notes if you’re several versions behind, since major updates occasionally include breaking changes.Backing up your data
Your entire n8n instance — workflows, credentials, and the encryption key that unlocks them — lives in the n8n_data Docker volume. Back it up periodically:
docker run --rm -v n8n-compose_n8n_data:/data -v $(pwd):/backup ubuntu \
tar czf /backup/n8n_data_backup_$(date +%F).tar.gz -C /data .
Store that .tar.gz file somewhere off the server — downloaded locally, or synced to cloud storage. If your VPS ever fails, this backup plus your compose.yaml and .env files are everything you need to restore n8n elsewhere.
Troubleshooting
- The domain doesn’t load / times out: Check that DNS has actually propagated — run nslookup n8n.yourdomain.com from your own computer and confirm it returns your VPS’s IP. DNS changes can take a few hours in some cases.
- Browser shows a certificate warning: This usually means Traefik hasn’t finished obtaining the certificate yet, or port 80 isn’t reachable (Let’s Encrypt’s verification uses it). Confirm ufw status shows port 80 as allowed, and check Traefik’s logs: docker compose logs traefik
- Containers show as “Restarting” or exit immediately: Check the logs for the specific container to see the actual error: docker compose logs n8n. A common cause is a typo in the .env file — double-check DOMAIN_NAME and SUBDOMAIN don’t have stray spaces or quotes.
- “Permission denied” errors when running Docker commands: Either keep using sudo before Docker commands (as this guide does), or add your user to the docker group so you don’t need to: sudo usermod -aG docker $USER, then log out and back in.
And You’re Done!
At this point you have a real, production-shaped n8n instance: your own domain, automatic HTTPS, workflow data that survives restarts, and a repeatable way to update and back it up. That’s a meaningfully more solid setup than the plain docker run commands you’ll see in shorter tutorials — and it’s built directly on n8n’s own recommended configuration, not a simplified stand-in for it.
From here, the natural next step is exploring n8n’s Quickstarts (docs.n8n.io) to start building your first workflow, or looking into scaling options (like queue mode) if you expect to run a large volume of automations later on.

Featured Post
How to Deploy n8n on Linux: A Complete Beginner’s Guide
Why this guide is for you… You’ve decided you want to run...

Hostnoc Editorial
July 16, 2026