How To Host a Dedicated ARK Server? | ARK Server Hosting

30 Top Trending Products to Sell Online at Your Ecommerce & Dropshipping Store in 2020
December 1, 2020
How to Host Your Own Counter-Strike: Global Offensive Dedicated Server?
December 15, 2020ARK: Survival Evolved is basically an action-adventure video game. Released in August 2017, it was made available on all major platforms such as Mac OS, Windows, PlayStation, Xbox, Nintendo Switch, Android and iOS. The best part about this game is that you can play it from a first-person and third-person perspective.
If you love playing ARK: Survival Evolved and want to set up ARK server hosting instead of relying on third-party vendors, then this article is for you. Even though it might take more effort to create, set up and host your own ARK dedicated server, it will be much cheaper than buying it from a hosting provider.
In this article, you will learn about how you can host an ARK dedicated server.
What is an ARK Dedicated Server?
ARK dedicated server is basically a computer that stores an instance of the game ARK:Survival Evolved. Gamers can connect to that instance and play the game. Some hosts prefer to host password protected dedicated servers while others leave it open for gamers.
An ARK dedicated server runs a setup to execute a specific instance of ARK Survival Evolved game. With ten predefined maps and an ability to create your own maps, you can run multiple servers at once too. Gamers can also hop from one server to another.
Types of ARK Dedicated Server?
ARK dedicated servers can broadly be categorized into two types:
- Personal Server
- Rented Server
Personal Server
If you have the right hardware at your disposal and know how to manage and maintain a dedicated server, creating a personal server is free. The key here is that you must have hardware that fulfills not only the minimum system requirements but also the recommended system requirement to run ARK:Survival Evolved.
Rented Server
If you opt for a rented server, it will save you from the hassle of setting up your own server. You are outsourcing everything to a hosting company and you only have to decide which map you want the server for. The server provider will take care of the rest. The cost usually depends on the number of players who will play the game.
Things To Consider When Opting For Rented Server
Here are some of the things you should consider when choosing a rented server.
- Uptime
When choosing the rented server option, you should opt for a server provider that guarantees high uptime. You can easily find many server providers making tall claims but only few back up their uptime claims. To be on the safe side, you need to choose a server provider that not only offers a high uptime guarantee but also backs it up with a service level agreement. This will mean that if they fail to maintain the promised service quality, you can get your money back.
- Bandwidth
Hosting games on a server is a highly resource intensive task and requires a lot of bandwidth. This is why you should always get more bandwidth for a rented server otherwise, it could have a negative impact on the gaming experience.
- Location of server
Look for a server location that is both located near you and your players. A server that is located far away will increase the likelihood of lags and delays while playing the game. Let’s say, if most of the players are located in the US, you should get a server which is also located in the US or atleast in a nearby country.
- DDoS Protection
Gaming servers have started becoming a prime target for DDoS attacks, which is why it is better to invest in a server that also offers DDoS protection. DDoS protected servers ensure that your gaming sessions are not interrupted due to denial of service.
Requirements that need to be fulfilled for ARK server hosting:
- Operating System
- RAM
- Bandwidth
- Network
- Hosting Environment
-
Operating System
If you are planning to host an ARK server, you should have some prerequisites. To begin, you should have a 64-bit operating system. If you don’t have a 64-bit operating system, you won’t be able to run the server and end up wasting a lot of time in troubleshooting.
Whether you choose Windows operating system or Linux operating system, you will have to fulfill different software requirements. For Windows, you need Microsoft Visual C++ distributable along with a DIRECT X setup file.Meanwhile 64 bit Linux servers will require 32 bit binaries to install and run steam command line interface. The game server demands Ubuntu 14.04 or newer and Debian 8 to fulfill all the requirements. If you are still stuck with older versions of Debian operating systems such as Debian 7 won’t fulfill all the requirements. In addition to this, you might also need glibc 2.14 or greater.
Let’s say you are still using Debian 7 and want to install the required version of glibc on it here is how you can do it.
- Add the following lines of code to /etc/apt/sources.list:
# Experimental/unstable (sid) repositories
deb http://ftp.debian.org/debian experimental main
deb http://ftp.debian.org/debian sid main
- Now, you will have to update the host’s package list and install the glibc library package. To do so, you will have to run these commands in a root shell or sudo:
apt-get update
apt-get -t experimental install libc6-dev
-
RAM
Next, check the amount of RAM. Your server must have at least 6GB RAM or more to run the server smoothly. If you are hosting 100 players on your server, you might also need an additional 4GB of RAM and the same trend continues as the number of players increases.
-
Bandwidth
You need a fast and reliable internet connection with upload speeds ranging anywhere from 10 Mbps or more. As a rule of thumb, the higher the number of users, the higher will be the bandwidth requirement. Another thing to keep in mind is that if you are playing the game on the same PC as the server, you might experience frame drops, lags and stutter every now and then, which is why it is better to use a separate PC to play the game.
-
Network
ARK dedicated servers will listen to incoming connections on the following ports.
- UDP 7777: Game client port
- UDP 7778: Raw UDP Socket port
- TCP 27020: Remote control server access
- UDP 27015: Query port for Steam server
Since steam uses ports from 27020 to 27050, you can not choose a query port in this range. Make sure that your network configuration allows incoming connections to these ports. In addition to this, you should also direct them to the host, which is running your dedicated server. Users can host multiple dedicated servers on the same host but it is important that you constantly monitor CPU and memory usage especially if you are using these servers for gaming and performance purposes instead of testing purposes.
-
Hard Disk
ARK server software takes up anywhere from 10 GB to 15 GB of storage space. Throw in some additional user files and extensions and you might need even more free space to accommodate all that stuff. To ensure smooth functioning, it is recommended that you have 30 GB or more free space.
To get better read and write speeds and ultra high responsiveness during the game, you should invest in an SSD based server instead of a traditional HDD based one. Not only are solid state drives deliver faster read and write performance but they can also last longer and consume less power due to lack of movable parts.
6. Hosting Environment
Last but certainly not least is to choose your hosting environment. You will have to decide which operating system or platform to choose, whether it is Windows or Linux. That is not all, you also must determine if you host the ARK server locally or through a VPS server. You can only make the right decision only when you know the differences between the two.
Linux users might need more RAM to build their ARK servers as compared to Windows. Data from Gamepedia shows that Windows server 2012 R2 takes approximately 2.3 GB RAM while Linux takes 3.2 GB RAM. Although, it might vary based on the Linux distribution you choose, you should consider this as a baseline.
Read: How to Install Counter-Strike: Global Offensive
How to Host A Local ARK Server?
-
Windows
Open Steam right-click ARK: Survival Evolved and click on Properties. Choose local files and go to browse local files. Next, go to ShooterGame>Binaries>Win64. You will have to create a new batch file. A batch file is a text file that contains all the commands which need be to execute by the command line interpreter.
Go to ShooterGameServer.exe file, then click New > Text Document. This will take you to a new text document file. Open that file and past this code.
<start ShooterGameServer.exe “MapName?SessionName=MySuperAwesomeArkServer?ServerPassword=
thisisoptional?ServerAdminPassword=megasecretadminpass?Port=27015?QueryPort=27016?listen
exit.
That’s not it. You should also change other perimeters as well. Some of them are as follows:
- ServerPassword
- ServerAdminPassword
- MapName
- SessionName
Once you are done changing all these perimeters, save the file. Double click on that file to start.
-
Linux
Linux users might have to tweak the syntax. Another difference between Windows and Linux is that you will be working with a shell file instead of a batch file, which is a little different. Next, open a text editor and copy this code.
<#! /bin/bash
./ShooterGameServerTheIsland?SessionName=MySuperAwesomeArkServer?ServerPassword=testpassword?
ServerAdminPassword=megasecretadminpass Port=27015?QueryPort=27016?listen
Once you are done, save the file in the Linux server files folder. Since Linux is a secure platform, it applies a restriction on the files you can execute and the files you cannot. That is why it is better that you run the file before to check whether it is working or not. Now, you can start the server by opening the terminal window and typing the file name.
Server Installation Options
There are two ways you can use for server installation.
- Steam UI installation
- SteamCMD
-
Steam UI Installation
Open Steam select tools from the library drop-down menu. Look for ARK: Survival Evolved Dedicated Server. Once you find it, right-click on it and hit install. Go to program files and find the file path. Next, open a text editor and copy this code:
<start ShooterGameServer.exe “TheIsland?SessionName=ArkServer?ServerPassword=testpassword?
ServerAdminPassword=adminpassword Port=27015?QueryPort=27016?listen”
exit
-
Steam CMD
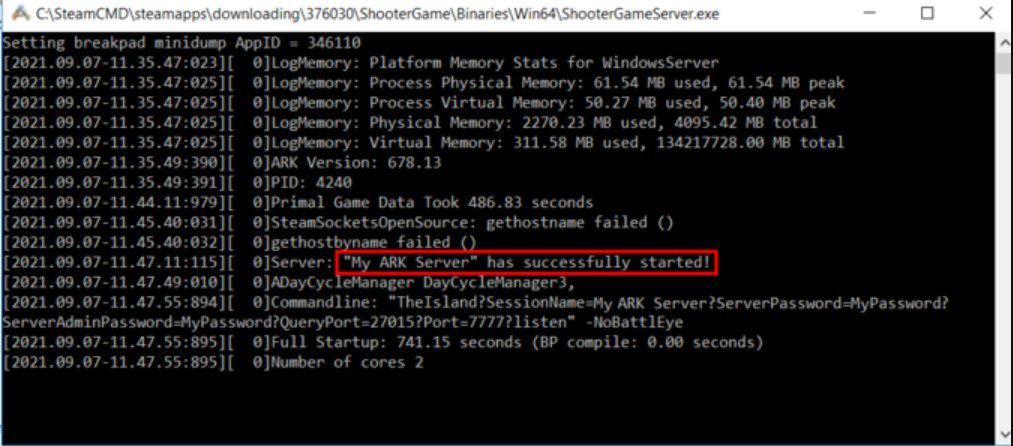
If you are a power user or using a VPS server or best dedicated server for hosting., you should use this method. Windows users should create a Steam CMD folder and then download Steam CMD. Create a new text file in the same folder by opening a text editor and pasting this code:
@echo off
start “” steamcmd.exe +login USER PASS +force_install_dir “C:\YOURSTEAMCMDFOLDER”
+app_update 346110 validate +quit
Save the file and run it as an administrator. It will start downloading the latest updates. Open the text editor to create another file and past this code:
start ShooterGameServer.exe “MapName?SessionName=ArkServer?ServerPassword=testpassword?
ServerAdminPassword=adminpassword?MultiHome=YourLocalIP?Port=27015?QueryPort=27016?listen
exit
Save that file. Double click the file to start the server. Next, you can configure the firewall, automatic startup and update and backup and you are good to go. It this process seems too daunting, you can also use third-party tools such as ARK Server Manager, ARK Commander and BattleMetricsRCOM.
Configuring Firewall
To make sure that other players can join the game without any hassle, you will have to configure the firewall, so it does not block the users and connection. If you are using Windows, you can easily do that by tweaking few settings. Here is how you can do it:
- Go to Start and type Firewall.
- Choose Inbound Rules, then New Rule
- Select Port and click Next
- Choose TCP and Specific local ports, then type 27020
- Press Next, choose Allow the connection, and click next
- A new dialog box will open with the three options: Domain, Private, and Public. Tick whichever are relevant to you and press Next. In the Name field, write “ARK Server TCP” and hit Finish.
- Repeat the process but this time choose UDP instead of TCP. Under specific local ports add 27015, 27016 and 7777.
- Keep the same settings as last time and name this one “ARK Server UDP”.
After configuring the ports, it is time to give access to the server program. Create a new rule by going into the program and press next. Find ShooterGameServer file and allow connections for both public and private connections. If you are playing the game on a local area network, you won’t have to do this configuration.
If you are using Ubuntu or Linux, opening your firewall ports is a breeze. Just paste the following in your terminal.
Sudo ufw enable
sudo ufw allow 7777/udp
sudo ufw allow 27015/udp
sudo ufw allow 27016/udp
sudo ufw allow 27020/tcp
Type sudo iptables -L and check under Chain ufw-user-input for the ports.
Port Forwarding
Once you have configured the firewall, now it is time to open your router’s inner firewall so it can accept connections from outside your network. For this, you will have to go to your router’s configuration page. Specify which ports you want to open so that it can accept connections from other networks.
The process can be a bit technical and steps might vary greatly from router to router. You might need admin access to perform this action. You can either visit portforward.com or conduct a Google search for your specific router. Write the name of the router along with the model in Google search along with port forward term. Let’s say, your router name is TP-Link Deco M9. So, your search query should be TP-Link Deco M9 port forward.
Always remember that, hosting players from outside your network can pose a security risk so you should only use port forwarding where extremely necessary. For port forwarding, you will have to open ports 27015, 27016, and 7777 for both TCP and UDP.
Automatic Startup
Here is how you can configure automatic startup for both Windows and Linux operating systems.
For Windows
Users can set up scheduled tasks to automatically execute a batch file. This allows them to start the dedicated server when their system starts.
- Create a basic task in task scheduler
- Name the task
- Select the trigger to “when computer starts” and action to “start a program”
- You will have to choose the program or script you want to execute. It is usually your batch file that turn on your server
- Tick the box that says “Open properties window” after creating the task
- Next, go to the general tab and choose the security option frame. Here you will find an option to “run whether the user is logged in or not”. Select that option
For Linux
Instead of running a script to launch a dedicated server manually, Linux users can configure systemd to automatically start the server when their system boots. To do so, you will first have to first specify the settings by going into the GameUserSettings.ini file.
- Create a file named /etc/systemd/system/ark-dedicated.service with this code.
[Unit]
Description=ARK: Survival Evolved dedicated server
Wants=network-online.target
After=syslog.target network.target nss-lookup.target network-online.target
[Service]
ExecStartPre=/home/steam/steamcmd +login anonymous +force_install_dir /home/steam/servers/ark +app_update 376030 +quit
ExecStart=/home/steam/servers/ark/ShooterGame/Binaries/Linux/ShooterGameServer TheIsland?listen?SessionName=<session_name> -server -log
WorkingDirectory=/home/steam/servers/ark/ShooterGame/Binaries/Linux
LimitNOFILE=100000
ExecReload=/bin/kill -s HUP $MAINPID
ExecStop=/bin/kill -s INT $MAINPID
User=steam
Group=steam
[Install]
WantedBy=multi-user.target
- Replace the session name with your own and tweak user and group settings for hosts
- Install systemd by using apt-get install systemd systemd-sysv command
- Reboot after installing systemd to activate the service
- Activate the new service by using # systemctl enable ark-dedicated command
- if that does not start your server immediately, you can use # systemctl start ark-dedicated command
Backup and Updates
Whether you install through Steam CMD or install through Steam UI, taking backups is super easy. If you have installed via the Steam command line, all you have to do is to run the SteamCMD.bat file. You can make changes according to your needs or automate the update process by visiting this website.
Linux users will have to go to the steamcmd folder and copy and past this script in the terminal.
./steamcmd.sh +login anonymous +force_install_dir /home/ubuntu/arkserver +app_update 376030 validate +quit
On the contrary, if you have installed through Steam user interface, you can update it in the same way as you would update any software or tool. Click the update button when you find a new build available. Users on local area network get the latest version with game updates.
Join The Server
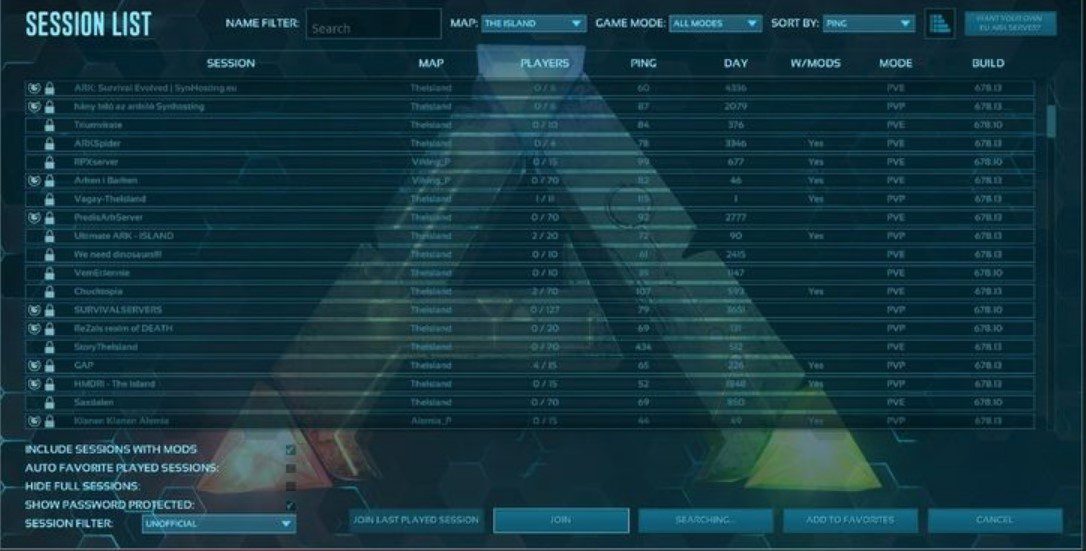
The ARK dedicated server will run based on the setup you have selected until you shut down your server or exit the SteamCMD. To join the server, here are the steps you need to follow:
- Launch ARK Survival Evolved by using Steam on your computer
- Select Join ARK option
- Choose Unofficial server filter
- Pick your desired ARK server from the list and click join
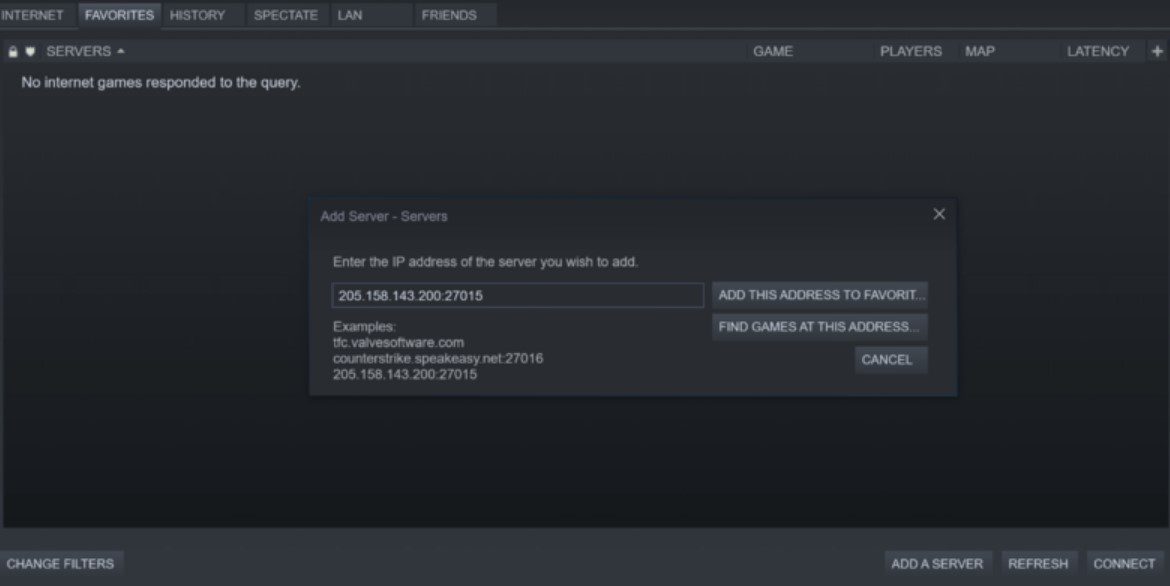
If you are going to connect to the same ARK dedicated server repeatedly, you could set it to favorites. Here is how to do it.
- Go to View where you will find an option for Servers, click on it.
- Toggle to Favorites tab
- Enter the IP address of the ARK server with appended port 27015
- Click on the add this address to favorites
Once the connection is established, you can start playing your game.
Summary
Here is a quick summary of steps you can take to run your ARK dedicated server.
- Connect to your server
- Install SteamCMD
- Open server ports
- Start ARK dedicated server
- Join ARK dedicated server
Which method do you use to set up and host an ARK dedicated server? Let us know in the comments section below.


