How To Host Your Own Mumble Dedicated Server?

How Much Does A Server Cost for a Small Business in 2021?
April 7, 2021
How COVID-19 Is Impacting Cybercrime and What You Can Do About It?
April 15, 2021Mumble is a free, open-source voice-over IP application designed primarily for gamers. Thanks to its client-server architecture, users can communicate with one another even if they are using the same server. What really makes it stand out from other similar applications are its high quality, low latency voice capabilities.
For starters, it makes use of a low latency audio codec known as Opus. This codec enables low latency communication, which means that it reduces the delay between when a message is being conveyed and when it is heard by the receiver. The software also comes preloaded with an echo cancellation feature, which comes in handy when you are using mediocre speakers or other acoustic hardware for communication or gaming.
Due to end-to-end encryption, you don’t have to worry about user privacy either. It also targets different user groups and offers different features catering to the needs of each group.
For Users
- Public/Private key authentication
- Low latency for gaming and chat
- In-game overlays
- Positional audio
- Ability to recognize friends across gaming servers
For Administrators
- An extensive user permission system
- Web interface
- Channel views
- Authenticators
- Ability to run custom chat commands and context
For Hosters
- Ability to choose between free and third-party servers
- Stable and free server software
- Access to channel viewer data without losing control
- Custom web interfaces for users coming through Ice
Just like any other VoIP client, you can either rent or host a mumble dedicated server. If you are planning to do it on your own, you will have to download, install and configure the Mumble client yourself.
Read How to Install Counter-Strike.
In this article, you will learn how to create, setup, host, connect and change your Mumble dedicated server.
How To Install a Mumble Client?
- Download the Mumble client from here, and install it
- Click on the mumble shortcut on the desktop to launch the Mumble client
- This will open Mumble server connect and mumble chat windows
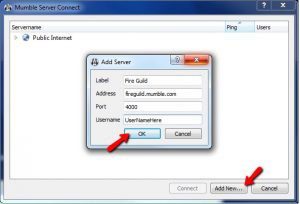
- Press the ‘Add New’ button in the Mumble server connect window
- Enter the label into the label field
- Copy the IP address of your Mumble server in the address form field
- Enter the port of your Mumble server in the port form field
- Type in your username in the username form field
- Click on “OK” and “Connect”
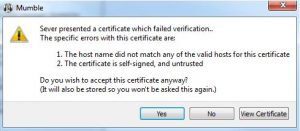
- Click “Yes” to accept the command prompt asking you about the certificate.
- A password entry window will pop up. Check the game panel for a private password and enter it.
- Users can remove the password to convert it into a public server, which means that other users won’t require permission to join the server.
- You are logged in to your server
- Click “Configure” on the audio tuning wizard
- Follow the instructions given in the prompt
- Test the settings to ensure other people can hear your voice
How To Add Channels and Become an Admin?
Here is how you can become an admin and add more channels.
- Before you become an admin, you will have to login as a SuperUser
- Use the RCON password you have set in the game panel of your Mumble login details
- Edit your login information as a particular server by going to the server and clicking Connect in the menu bar. Choose the server you have created, right-click it and select “Edit”
- Go to the “Groups” tab
- Select the “Admin” from the drop-down Group menu
- Now, you can become the admin of the server without using the SuperUser user name
- Enter your desired admin user name in the “Member” box, click “Add” and then ‘OK’.
- Log out to change your server login information to log back in with your own username
- Right-click on the root channel to add more channels. Type in all the required information and click “OK”
Read How to Create PUBG Dedicated Server.
How To Connect To Mumble Server?
Here is how you can connect to a Mumble server:
- Open the Mumble client software
- Choose “Server” from top menu bar
- Click “Connect”
- This will open the “Mumble server connect” dialog box
- To add a server to your favorite list, click “Add New”
- Enter the label, server address, and port number of your server
- Type in your user name and click “OK”
- Connect to your server
- Select the newly created server in your favorites and click “Connect”
How To Change Server Settings?
If you want to edit the settings of your Mumble server, you need a BeastNode game panel. Once you have a BeastNode game panel, you can use the following steps to tweak the Mumble dedicated server settings.
- Login to your BeastNode panel
- On the right-hand side of the Mumble dedicated server, click on the“Manage Game” button
- Replace the RCON password with a secure password. You can now use that password to login to your SuperUser account
- Remember that you will need a private password to enter your Mumble server
Which method do you use to host mumble dedicated servers? Let us know in the comments section below.


